Processing (termasuk P5.js), yang merupakan salah satu bahasa pemrograman umum, seringkali digunakan untuk keperluan desain, baik terapannya dalam bentuk Desktop, Web, maupun Android. Pada Processing pula, kita dapat menciptakan suatu automasi sederhana, baik untuk keperluan mekanik maupun untuk keperluan desain. Banyak sekali konsep automasi yang dapat kita terapkan kedalam Processing. Salah satu bentuk automasi sederhana ialah automated trailing (atau automasi dengan cara mengikuti jejak rekaan).
Sebagai penerapan dari konsep automated trailing, pada artikel kali ini, kita akan membuat trailing object maker menggunakan bahasa pemrograman P5.js (selaku subsider dari Javascript).
Langkah:
1. Persiapkan text editor (notepad, sublime text, dan sebagainya) sebagai media pengetikan syntax nantinya.
2. Buatlah file yang bernama index.html yang berisikan kode sebagai berikut:
<html>
<head>
  <title>Inwepo Trailing Object Maker</title>
  <script src="https://cdnjs.cloudflare.com/ajax/libs/p5.js/0.4.10/p5.js"></script>
  <style>
  </style>
</head>
<body>
  <script>
  </script>
</body>
</html>
3. Pada bagian <style>, masukkan kode berikut:
body {
  padding: 0;
  margin: 0;
  background-color: #FFFFFF;
}
Nantinya, bagian <style> akan memiliki struktur kode sebagai berikut:
<style>
	body {
	  padding: 0;
	  margin: 0;
	  background-color: #FFFFFF;
	}
</style>
4. Pada bagian <script>, masukkan kode berikut:
var particles = [];
var cnoise = 0;
var particlesNum = 10;

function setup() {
    createCanvas(windowWidth, windowHeight);
    angleMode(DEGREES);
    for (var i = 0; i < particlesNum; i++) {
        particles[i] = new Particle(random(width), 0, map(noise(cnoise + i), 0, 1, 0, 255));
    }
}

function header(){
	fill(color(20, 36, 56));
    rect(0,0,width,100);
	fill(24,46,97);
	textFont('Segoe UI');
	textSize(50);
	fill(255);
	textAlign(CENTER);
	text("Inwepo Trailing Object Maker", width/2, 60);
}

function draw() {
    background(20, 36, 56);
    for (var i = 0; i < particles.length; i++) {
        particles[i].applyForce();
        particles[i].update();
        particles[i].display();
        particles[i].checkEdges();
    }
	header();
}

function mousePressed() {
    particles.push(new Particle(mouseX, mouseY, map(noise(cnoise), 0, 1, 0, 255)));
    cnoise += 0.1;
}

function keyPressed() {
    particles.splice(0, 1);
}

function Particle(x, y, c) {
    this.size = 20;

    this.pos = new p5.Vector(x, y);
    this.vel = new p5.Vector(0, 0);
    this.acc = new p5.Vector(0, 0);
    this.history = [];

    this.maxvel = 5;
    this.col = c || 255;

    this.update = function() {
        this.vel.add(this.acc);
        this.vel.limit(this.maxvel);
        this.pos.add(this.vel);

        this.acc.mult(0);

        var hv = createVector(this.pos.x, this.pos.y);
        this.history.push(hv);
        if (this.history.length > 30) {
            this.history.splice(0, 1);
        }
    }

    this.display = function() {
        noStroke();
        var ca = constrain(c + 30, 0, 250);
        fill(ca, 0, 150);
        ellipse(this.pos.x, this.pos.y, this.size, this.size);
        fill(c, 0, 150, 30);
        for (var i = 0; i < this.history.length; i++) {
            ellipse(this.history[i].x, this.history[i].y, i * 2, i * 2);
        }
    }

    this.applyForce = function() {
        var myAngle = random(-360, 360);
        this.acc = p5.Vector.fromAngle(radians(myAngle));
    }

    this.checkEdges = function() {
        if (this.pos.x > width) {
            this.pos.x = 0;
        } else if (this.pos.x < 0) {
            this.pos.x = width;
        }

        if (this.pos.y > height) {
            this.pos.y = 0;
        } else if (this.pos.y < 0) {
            this.pos.y = height;
        }
    }

}
Nantinya, bagian <script> akan memiliki struktur kode sebagai berikut:
<script>
	var particles = [];
	var cnoise = 0;
	var particlesNum = 10;

	function setup() {
		createCanvas(windowWidth, windowHeight);
		angleMode(DEGREES);
		for (var i = 0; i < particlesNum; i++) {
			particles[i] = new Particle(random(width), 0, map(noise(cnoise + i), 0, 1, 0, 255));
		}
	}

	function header(){
		fill(color(20, 36, 56));
		rect(0,0,width,100);
		fill(24,46,97);
		textFont('Segoe UI');
		textSize(50);
		fill(255);
		textAlign(CENTER);
		text("Inwepo Trailing Object Maker", width/2, 60);
	}

	function draw() {
		background(20, 36, 56);
		for (var i = 0; i < particles.length; i++) {
			particles[i].applyForce();
			particles[i].update();
			particles[i].display();
			particles[i].checkEdges();
		}
		header();
	}

	function mousePressed() {
		particles.push(new Particle(mouseX, mouseY, map(noise(cnoise), 0, 1, 0, 255)));
		cnoise += 0.1;
	}

	function keyPressed() {
		particles.splice(0, 1);
	}

	function Particle(x, y, c) {
		this.size = 20;

		this.pos = new p5.Vector(x, y);
		this.vel = new p5.Vector(0, 0);
		this.acc = new p5.Vector(0, 0);
		this.history = [];

		this.maxvel = 5;
		this.col = c || 255;

		this.update = function() {
			this.vel.add(this.acc);
			this.vel.limit(this.maxvel);
			this.pos.add(this.vel);

			this.acc.mult(0);

			var hv = createVector(this.pos.x, this.pos.y);
			this.history.push(hv);
			if (this.history.length > 30) {
				this.history.splice(0, 1);
			}
		}

		this.display = function() {
			noStroke();
			var ca = constrain(c + 30, 0, 250);
			fill(ca, 0, 150);
			ellipse(this.pos.x, this.pos.y, this.size, this.size);
			fill(c, 0, 150, 30);
			for (var i = 0; i < this.history.length; i++) {
				ellipse(this.history[i].x, this.history[i].y, i * 2, i * 2);
			}
		}

		this.applyForce = function() {
			var myAngle = random(-360, 360);
			this.acc = p5.Vector.fromAngle(radians(myAngle));
		}

		this.checkEdges = function() {
			if (this.pos.x > width) {
				this.pos.x = 0;
			} else if (this.pos.x < 0) {
				this.pos.x = width;
			}

			if (this.pos.y > height) {
				this.pos.y = 0;
			} else if (this.pos.y < 0) {
				this.pos.y = height;
			}
		}

	}
</script>
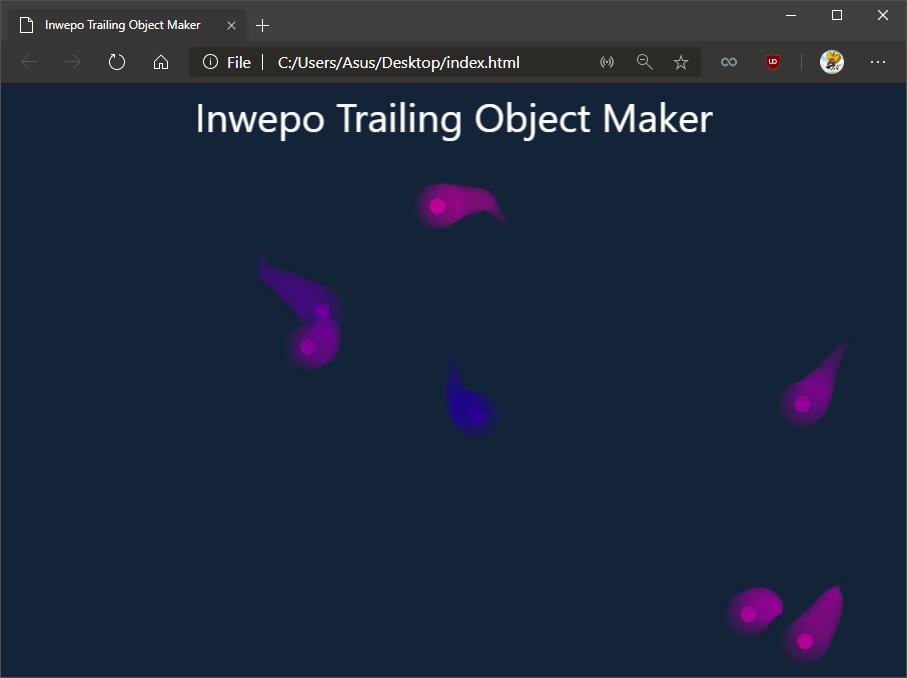
5. Save file yang telah dimodifikasi sebelumnya. Lalu, buka file index.html melalui browser kamu. Jika berhasil, nantinya halaman website akan menampilkan konten teks menyertakan desain object trail sesuai dengan syntax yang telah kita tetapkan sebelumnya. Adapun kita juga bisa menambahkan maupun mengurangi obyek trail yang ada di dalam background / canvas dalam website. Sesuaikan penggunaan animasi trailing object maker dengan website yang telah kamu buat.
Demikian tutorial cara membuat trailing object maker dengan Javascript. Semoga bermanfaat.