Sebagai bahasa alternatif dari Javascript, P5.js (atau yang biasa dikenal sebagai Processing Javascript) memiliki banyak sekali bentuk implementasi desain yang dapat kita terapkan secara menyeluruh (baik melalui reimplementasi desain maupun desain individu), baik dalam konteks desain halaman belakang (atau yang biasa disebut sebagai background), rupa layout, hingga fungsionalitas dari website terkait.
Efek cursor trail Javascript
Maka tidak heran jika banyak pengembang front-end mulai menggunakan bahasa pemrograman seperti P5.js sebagai salah satu komponen alternatif, baik dikarenakan pola syntax-nya yang tidak beda jauh dengan format javascript secara umum, maupun penggunaan komponen yang telah disederhanakan oleh pengembang aplikasi.
Sebagai bentuk implementasi dari bahasa pemrograman P5.js, maka pada artikel kali ini, penulis akan membuat membuat efek cursor trail pada gerakan kursor menggunakan beberapa function yang telah disediakan pada Processing (selaku subsider dari Javascript).
Cara Membuat Efek Cursor Trail
1. Persiapkan text editor (baik notepad, sublime text, atau aplikasi serupa) sebagai media pengetikan syntax nantinya.
2. Pada halaman text editor, buatlah file yang bernama index.html yang berisikan kode sebagai berikut:
<html>
<head>
  <title>Inwepo Cursor Trails</title>
  <script type="text/javascript" src="https://cdnjs.cloudflare.com/ajax/libs/p5.js/0.5.2/p5.js"></script>
  <script type="text/javascript" src="https://code.jquery.com/jquery-2.2.4.min.js"></script>
  <style>
</head>
<body>
  <h1>Inwepo</h1>
  <p>Efek Cursor Trails</p>
</body>
</html>
3. Pada bagian <style>, masukkan bagian kode berikut:
html {
  margin: 0;
  height: 100%;
}

body {
  font-family: "Segoe UI", sans-serif;
  position: relative;
  margin: 0 auto;
  max-width: 1000px;
  height: 100%;
  color: #141414;
  text-align: center;
}

h1 {
  position: relative;
  font-size: 40px;
  font-weight: 200;
  margin: 0;
  top: 30px;
}

p {
  margin-top: 30px;
  font-weight: 600;
  font-size: 21px;
  background: #ff3333;
  display: table;
  margin: 35px auto;
  color: #fff;
  padding: 5px 15px;
}

canvas {
  position: fixed;
  top: 0;
  left: 0;
  z-index: -1;
}
Nantinya, bagian <style> akan memilki struktur kode sebagai berikut:
<style>
  html {
    margin: 0;
    height: 100%;
  }

  body {
    font-family: "Segoe UI", sans-serif;
    position: relative;
    margin: 0 auto;
    max-width: 1000px;
    height: 100%;
    color: #141414;
    text-align: center;
  }

  h1 {
    position: relative;
    font-size: 40px;
    font-weight: 200;
    margin: 0;
    top: 30px;
  }

  p {
    margin-top: 30px;
    font-weight: 600;
    font-size: 21px;
    background: #ff3333;
    display: table;
    margin: 35px auto;
    color: #fff;
    padding: 5px 15px;
  }

  canvas {
    position: fixed;
    top: 0;
    left: 0;
    z-index: -1;
  }
</style>
4. Pada bagian <script>, masukkan bagian kode berikut:
function setup() {
    createCanvas(windowWidth, windowHeight);
  }

function draw() {
  background('#ffffff');

  stroke('#bdbdbd')
  strokeWeight(3);
  for(var i = 0; i < width; i = i + 80) {
    for(var j = 0; j < height; j = j + 80) {
      point(i, j);
    }
  }

  strokeWeight(1);

  al.push(new Trails());

  for( var i = 0; i < al.length; i++ ) {
    var t = al[i];
      t.applyForce(new p5.Vector(random( -0.5, 0.5 ), random( 0.01, 0.05 )));
      t.update();
      t.render();
      if(t.isDead())
        al.shift();
    }
  }

  function windowResized() {
    resizeCanvas(windowWidth, windowHeight);
  }

  function Trails() {
    this.counter = 0;
    this.position = new p5.Vector( mouseX, mouseY );
    this.velocity = new p5.Vector( 0, 0 );
    this.acceleration = new p5.Vector( 0, 0 );
    this.lifeSpan = 1;
  }

   Trails.prototype.applyForce = function(force) {
    acceleration = force;
  }

  Trails.prototype.update = function() {
    this.velocity.add(this.acceleration);
    this.position.add(this.velocity);
    this.lifeSpan -= 0.04;
  }

  Trails.prototype.render = function() {
    var c = color('rgba(237, 0, 0, ' + this.lifeSpan + ')');
    stroke(c);
    line(this.position.x, this.position.y, pmouseX, pmouseY);
  }

  Trails.prototype.isDead = function() {
    if(this.lifeSpan < 0.1)
      return true;
    else
      return false;
  }
Jika sudah, maka tampilan keseluruhan file index.html akan berbentuk sebagai berikut:
<html>
<head>
  <title>Inwepo Cursor Trails</title>
  <script type="text/javascript" src="https://cdnjs.cloudflare.com/ajax/libs/p5.js/0.5.2/p5.js"></script>
  <script type="text/javascript" src="https://code.jquery.com/jquery-2.2.4.min.js"></script>
  <style>
  html {
    margin: 0;
    height: 100%;
  }

  body {
    font-family: "Segoe UI", sans-serif;
    position: relative;
    margin: 0 auto;
    max-width: 1000px;
    height: 100%;
    color: #141414;
    text-align: center;
  }

  h1 {
    position: relative;
    font-size: 40px;
    font-weight: 200;
    margin: 0;
    top: 30px;
  }

  p {
    margin-top: 30px;
    font-weight: 600;
    font-size: 21px;
    background: #ff3333;
    display: table;
    margin: 35px auto;
    color: #fff;
    padding: 5px 15px;
  }

  canvas {
    position: fixed;
    top: 0;
    left: 0;
    z-index: -1;
  }
  </style>
</head>
<body>
  <h1>Inwepo</h1>
  <p>Efek Cursor Trails</p>
  <script>
  var al = [];
function setup() {
    createCanvas(windowWidth, windowHeight);
  }

function draw() {
  background('#ffffff');

  stroke('#bdbdbd')
  strokeWeight(3);
  for(var i = 0; i < width; i = i + 80) {
    for(var j = 0; j < height; j = j + 80) {
      point(i, j);
    }
  }

  strokeWeight(1);

  al.push(new Trails());

  for( var i = 0; i < al.length; i++ ) {
    var t = al[i];
      t.applyForce(new p5.Vector(random( -0.5, 0.5 ), random( 0.01, 0.05 )));
      t.update();
      t.render();
      if(t.isDead())
        al.shift();
    }
  }

  function windowResized() {
    resizeCanvas(windowWidth, windowHeight);
  }

  function Trails() {
    this.counter = 0;
    this.position = new p5.Vector( mouseX, mouseY );
    this.velocity = new p5.Vector( 0, 0 );
    this.acceleration = new p5.Vector( 0, 0 );
    this.lifeSpan = 1;
  }

   Trails.prototype.applyForce = function(force) {
    acceleration = force;
  }

  Trails.prototype.update = function() {
    this.velocity.add(this.acceleration);
    this.position.add(this.velocity);
    this.lifeSpan -= 0.04;
  }

  Trails.prototype.render = function() {
    var c = color('rgba(237, 0, 0, ' + this.lifeSpan + ')');
    stroke(c);
    line(this.position.x, this.position.y, pmouseX, pmouseY);
  }

  Trails.prototype.isDead = function() {
    if(this.lifeSpan < 0.1)
      return true;
    else
      return false;
  }
  </script>
</body>
</html>
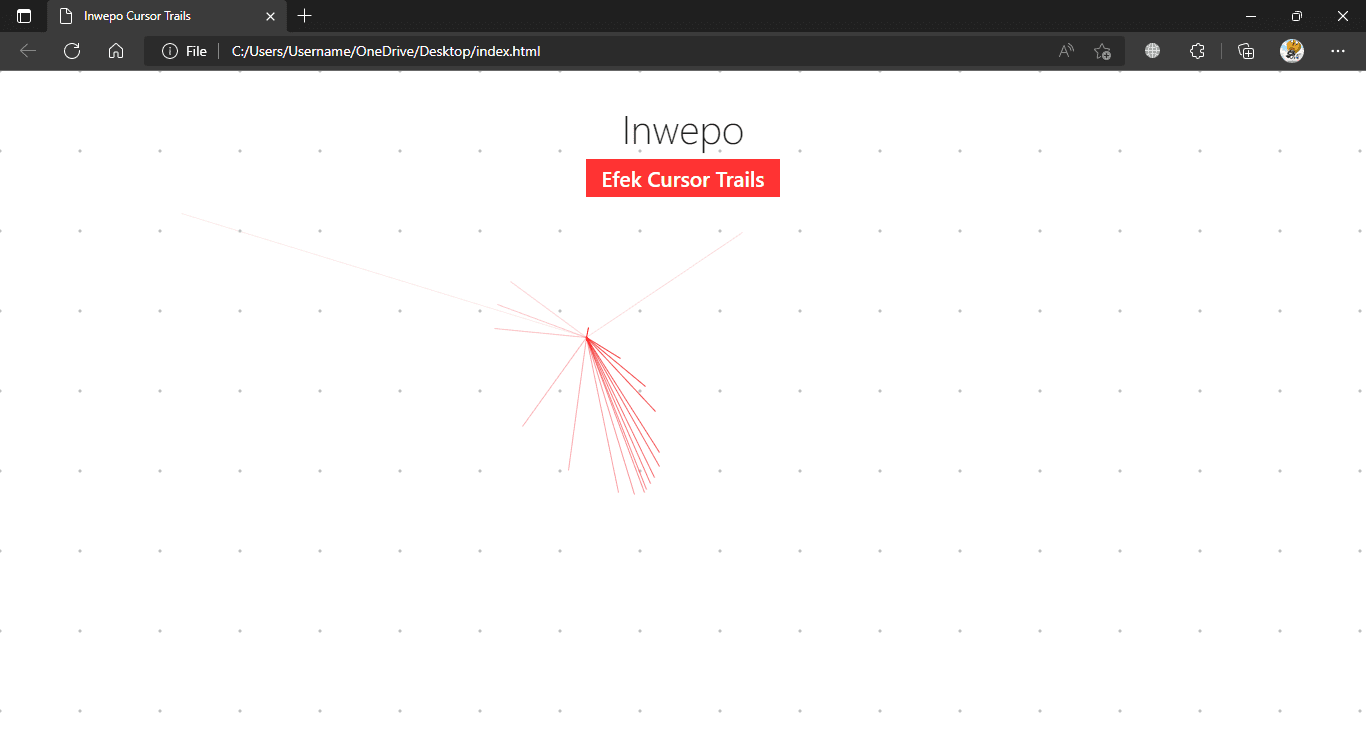
5. Save file yang telah dimodifikasi sebelumnya. Lalu, buka file index.html melalui browser kamu. Nantinya, halaman website akan tampak kosong dengan hanya berisikan beberapa teks tambahan yang berada pada tengah halaman. Hanya saja, ketika kamu menggerakan kursor kedalam halaman website, efek garis berwarna akan mengikuti gerakan kursor-mu, mengindikasikan bahwa penerapan efek cursor trail telah berhasil diterapkan.
Demikian tutorial cara membuat efek cursor trail dengan Javascript. Semoga artikel kali ini bermanfaat bagi para pembaca.