Sebagai bahasa alternatif dari Javascript, P5.js memiliki banyak sekali implementasi desain yang dapat kita terapkan secara menyeluruh (maupun di variasikan tersendiri), baik dalam konteks background, layout, hingga fungsionalitas dari website tersendiri. Tidak heran, jika banyak pengembang front-end mulai menggunakan bahasa pemrograman P5.js, baik karena pola syntax-nya yang lebih ramah pengguna, maupun komponen-nya yang telah disederhanakan oleh pengembangnya.
Sebagai bentuk implementasi dari komponen desain pada bahasa pemrograman terkait, pada artikel kali ini, kita akan membuat animasi marching square menggunakan bahasa pemrograman P5.js (subsider dari Javascript).
Langkah:
1. Persiapkan text editor (notepad, sublime text, dan sebagainya) sebagai media pengetikan syntax nantinya.
2. Buatlah file yang bernama index.html yang berisikan kode sebagai berikut:
<html>
<head>
  <title>Inwepo Marching Square</title>
  <script type="text/javascript" src="https://cdnjs.cloudflare.com/ajax/libs/p5.js/0.7.2/p5.min.js"></script>
  <style>
  </style>
</head>
<body>
  <script>
  </script>
</body>
</html>
3. Pada bagian <style>, masukkan kode berikut:
* {
  margin:0;
  padding:0;
}

html, body {
  width:100%;
  height:100%;
  overflow: hidden;
  background:black;
}

canvas {
   display:block;
}

#controls {
   z-index: 2;
   margin: 20px;
   position: absolute;
   top: 0; left: 0;
   color: white;
}
Nantinya, bagian <style> akan memiliki struktur kode sebagai berikut:
<style>
   * {
     margin:0;
	 padding:0;
   }

    html, body {
	  width:100%;
	  height:100%;
	  overflow: hidden;
	  background:black;
	}

    canvas {
	  display:block;
	}

    #controls {
      z-index: 2;
      margin: 20px;
      position: absolute;
      top: 0; left: 0;
      color: white;
    }
</style>
4. Pada bagian <body>, masukkan kode berikut:
<div id="controls"></div>
Nantinya, bagian <body> akan memiliki struktur kode sebagai berikut:
<body>
  <div id="controls"></div>
  <script>
  </script>
</body>
5. Pada bagian <script>, masukkan kode berikut:
let cellSize = 40;
let cells = [];
let gridWidth, gridHeight;
let cellWidth, cellHeight;

let noiseScale = 5;
let thresh = .5;

let dirs = [
  [0, 0],[1, 0],[1, 1],[0, 1]
]

let verts = [
  [0.0, 0.0],[0.5, 0.0],[1.0, 0.0],
  [0.0, 0.5],[0.5, 0.5],[1.0, 0.5],
  [0.0, 1.0],[0.5, 1.0],[1.0, 1.0],
]

let tris = [
  [[]],
  [[0, 1, 3]],
  [[1, 2, 5]],
  [[0, 2, 5],[0, 3, 5]],
  [[5, 7, 8]],
  [[0, 1, 3],[5, 7, 8],[1, 3, 7],[1, 5, 7]],
  [[1, 7, 8],[1, 2, 8]],
  [[0, 2, 3],[2, 3, 7],[2, 7, 8]],
  [[3, 6, 7]],
  [[0, 1, 6],[1, 6, 7]],
  [[1, 2, 5],[3, 6, 7],[1, 3, 7],[1, 5, 7]],
  [[0, 2, 5],[0, 5, 7],[0, 6, 7]],
  [[3, 5, 6],[5, 6, 8]],
  [[0, 1, 6],[1, 5, 6],[5, 6, 8]],
  [[1, 2, 8],[1, 3, 8],[3, 6, 8]],
  [[0, 2, 6],[2, 6, 8]],
]

class Cell{
  constructor(x, y, idx){
    this.x   = x;
    this.y   = y;
    this.idx = idx;
    this.oridnal = 0;
    this.val = idx%16;
    this.col = 0;
  }
  update(){
    let val = 0;
    for (let i = 0; i < dirs.length; i++){
      let dir = dirs[i];
      let n   = noise((this.x+dir[0])/noiseScale, (this.y+dir[1])/noiseScale, frameCount/100);
      let v   = n < thresh ? 1 : 0;
      val |= (v<<i);
    }

    this.col = noise((this.x+.5)/noiseScale, (this.y+.5)/noiseScale, frameCount/100);

    this.col = min(this.col*(1/thresh), 1);
    this.val = val;
  }

  render(){
    push();

    scale(cellWidth, cellHeight);
    translate(this.x, this.y);
    fill(this.col);
    stroke(this.col);
    strokeWeight(1/min(cellWidth, cellHeight));

    let ts = tris[this.val];
    for (let t of ts){
      if (t.length != 3) continue;
      triangle(...(verts[t[0]]), ...(verts[t[1]]), ...(verts[t[2]]))
    }

    pop();
  }
}

function setup (){
  pixelDensity(1);
  createCanvas();
  colorMode(HSB, 1, 1, 1);
  strokeJoin(BEVEL);
  windowResized();
}

function init(){
  cells = [];
  gridWidth = floor(width/cellSize);
  gridHeight = floor(height/cellSize);
  cellWidth = width/gridWidth;
  cellHeight = height/gridHeight;

  for (let i = 0; i < gridWidth; i++){
    for (let j = 0; j < gridHeight; j++){
      let cell = new Cell(i, j, cells.length);
      cells.push(cell);
    }
  }
}

function draw(){
  background(0);
  cells.map(cell => {
    cell.update();
    cell.render();
  })
}

function windowResized(){
  resizeCanvas(windowWidth, windowHeight);
  init();
}
Nantinya, bagian <script> akan memiliki struktur kode sebagai berikut:
<script>
	let cellSize = 40;
	let cells = [];
	let gridWidth, gridHeight;
	let cellWidth, cellHeight;

	let noiseScale = 5;
	let thresh = .5;

	let dirs = [
	  [0, 0],[1, 0],[1, 1],[0, 1]
	]

	let verts = [
	  [0.0, 0.0],[0.5, 0.0],[1.0, 0.0],
	  [0.0, 0.5],[0.5, 0.5],[1.0, 0.5],
	  [0.0, 1.0],[0.5, 1.0],[1.0, 1.0],
	]

	let tris = [
	  [[]],
	  [[0, 1, 3]],
	  [[1, 2, 5]],
	  [[0, 2, 5],[0, 3, 5]],
	  [[5, 7, 8]],
	  [[0, 1, 3],[5, 7, 8],[1, 3, 7],[1, 5, 7]],
	  [[1, 7, 8],[1, 2, 8]],
	  [[0, 2, 3],[2, 3, 7],[2, 7, 8]],
	  [[3, 6, 7]],
	  [[0, 1, 6],[1, 6, 7]],
	  [[1, 2, 5],[3, 6, 7],[1, 3, 7],[1, 5, 7]],
	  [[0, 2, 5],[0, 5, 7],[0, 6, 7]],
	  [[3, 5, 6],[5, 6, 8]],
	  [[0, 1, 6],[1, 5, 6],[5, 6, 8]],
	  [[1, 2, 8],[1, 3, 8],[3, 6, 8]],
	  [[0, 2, 6],[2, 6, 8]],
	]

	class Cell{
	  constructor(x, y, idx){
		this.x   = x;
		this.y   = y;
		this.idx = idx;
		this.oridnal = 0;
		this.val = idx%16;
		this.col = 0;
	  }
	  update(){
		let val = 0;
		for (let i = 0; i < dirs.length; i++){
		  let dir = dirs[i];
		  let n   = noise((this.x+dir[0])/noiseScale, (this.y+dir[1])/noiseScale, frameCount/100);
		  let v   = n < thresh ? 1 : 0;
		  val |= (v<<i);
		}

		this.col = noise((this.x+.5)/noiseScale, (this.y+.5)/noiseScale, frameCount/100);

		this.col = min(this.col*(1/thresh), 1);
		this.val = val;
	  }

	  render(){
		push();

		scale(cellWidth, cellHeight);
		translate(this.x, this.y);
		fill(this.col);
		stroke(this.col);
		strokeWeight(1/min(cellWidth, cellHeight));

		let ts = tris[this.val];
		for (let t of ts){
		  if (t.length != 3) continue;
		  triangle(...(verts[t[0]]), ...(verts[t[1]]), ...(verts[t[2]]))
		}

		pop();
	  }
	}

	function setup (){
	  pixelDensity(1);
	  createCanvas();
	  colorMode(HSB, 1, 1, 1);
	  strokeJoin(BEVEL);
	  windowResized();
	}

	function init(){
	  cells = [];
	  gridWidth = floor(width/cellSize);
	  gridHeight = floor(height/cellSize);
	  cellWidth = width/gridWidth;
	  cellHeight = height/gridHeight;

	  for (let i = 0; i < gridWidth; i++){
		for (let j = 0; j < gridHeight; j++){
		  let cell = new Cell(i, j, cells.length);
		  cells.push(cell);
		}
	  }
	}

	function draw(){
	  background(0);
	  cells.map(cell => {
		cell.update();
		cell.render();
	  })
	}

	function windowResized(){
	  resizeCanvas(windowWidth, windowHeight);
	  init();
	}
</script>
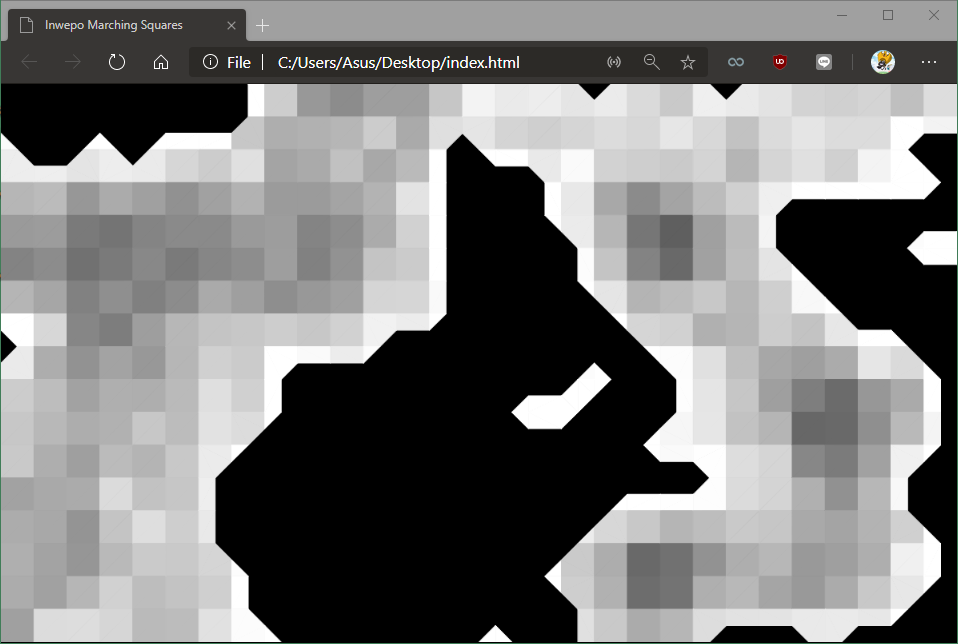
6. Save file yang telah dimodifikasi sebelumnya. Lalu, buka file index.html melalui browser kamu. Nantinya, halaman website akan berisikan animasi kotak dengan gradasi putih hingga abu-abu (mewakili dominasi lokasi dari kotak-nya), serta di dasari dengan warna hitam sebagai background-nya.
Perlu diperhatikan bahwa bentuk dari marching square akan selalu berubah tiap kali pengguna mengakses halaman terkait (perubahan di dasari oleh algortima acak serta penggunaan array yang telah ditetapkan dalam syntax). Sesuaikan penggunaan animasi marching square dengan website yang telah kamu buat sebelumnya.

Demikian tutorial cara membuat animasi marching square dengan Javascript. Semoga bermanfaat.


