Dengan bantuan dari bahasa pemrograman CSS, kita dapat dengan mudah membuat tampilan unik dan menarik di semua fitur website. Tidak terkecuali fitur checkbox. Lalu, bagaimana cara membuat sebuah animasi custom di checkbox? Yuk langsung saja buka komputer kamu, dan ikuti beberapa langkah mudah di bawah ini.
Tutorial
1. Buka XAMPP Control Panel, serta aktifkan Apache.
2. Buka program teks editor yang ter-install di komputer kamu, disini saya menggunakan teks editor Notepad++. Ketikkan kode HTML5 berikut ini.
<!DOCTYPE html>
<html lang="en">
<head>
	<meta charset="UTF-8">
	<title>Membuat animasi custom checkbox</title>
	<link rel="stylesheet" href="style.css">
	<script src="https://kit.fontawesome.com/b99e675b6e.js"></script>
</head>
<body>

<div class="wrapper">
	<div class="checkbox_container">
		<p class="title">Beritahu saya ketika ada file:</p>
		<div class="checkbox_wrap">
			<div class="checkbox_left">
				Unggah
			</div>
			<div class="checkbox_right">
				<i class="fas fa-check"></i>
				<input type="checkbox" class="checkbox">
				<i class="fas fa-times"></i>
			</div>
		</div>
		<div class="checkbox_wrap">
			<div class="checkbox_left">
				Unggah Ulang
			</div>
			<div class="checkbox_right">
				<i class="fas fa-check"></i>
				<input type="checkbox" class="checkbox">
				<i class="fas fa-times"></i>
			</div>
		</div>
		<div class="checkbox_wrap">
			<div class="checkbox_left">
				Didownload
			</div>
			<div class="checkbox_right">
				<i class="fas fa-check"></i>
				<input type="checkbox" class="checkbox">
				<i class="fas fa-times"></i>
			</div>
		</div>
		<div class="checkbox_wrap">
			<div class="checkbox_left">
				Komentar
			</div>
			<div class="checkbox_right">
				<i class="fas fa-check"></i>
				<input type="checkbox" class="checkbox">
				<i class="fas fa-times"></i>
			</div>
		</div>
		<div class="checkbox_wrap">
			<div class="checkbox_left">
				Dihapus
			</div>
			<div class="checkbox_right">
				<i class="fas fa-check"></i>
				<input type="checkbox" class="checkbox">
				<i class="fas fa-times"></i>
			</div>
		</div>
	</div>
</div>

</body>
</html>
Simpan kode HTLM5 di atas di folder xampplite – htdocs – buat folder baru dengan nama CustomCheckbox – simpan kode di atas dengan nama index.html.
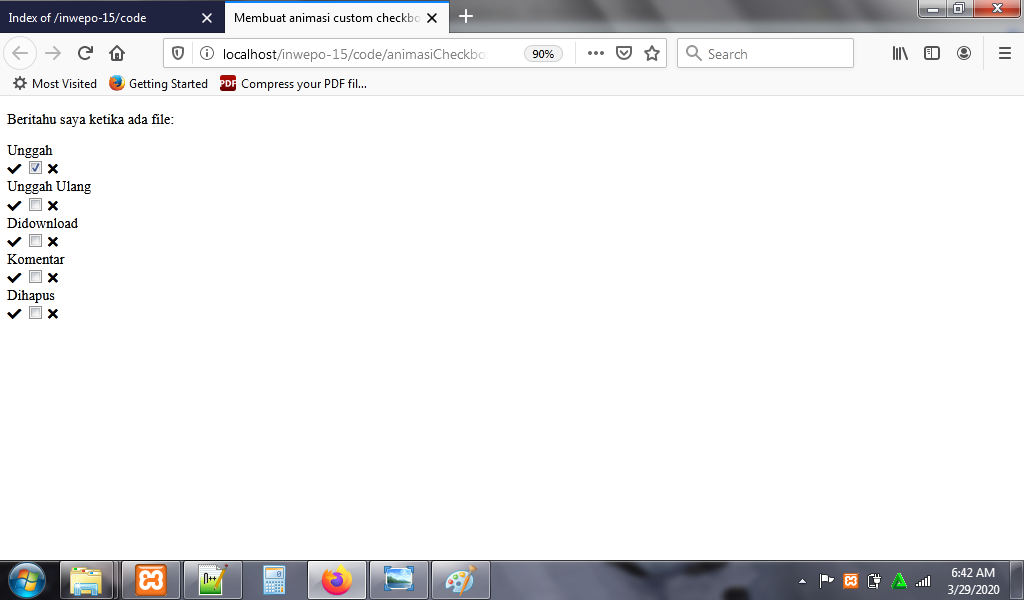
3. Untuk melihat hasil script code di atas, kamu bisa buka browser kamu ketiklah http://localhost/CustomCheckbox.
4. Untuk merapikan tampilan custom checkbox, ketikkan kode CSS berikut ini.
@import url('https://fonts.googleapis.com/css?family=Montserrat:400,700&display=swap');

*{
	margin: 0;
	padding: 0;
	box-sizing: border-box;
	font-family: 'Montserrat', sans-serif;
}

body{
	background: #e6e6fa;
}

.wrapper{
	width: 500px;
	background: #ffefd5;
	margin: 100px auto 0;
	padding: 30px;
	border-radius: 3px;
}

.wrapper .title{
	text-align: center;
	font-weight: 700;
	font-size: 24px;
	padding-bottom: 30px;
}

.checkbox_wrap{
	display: flex;
	width: 440px;
	background: #fafbfc;
	margin-bottom: 20px;
	padding: 10px 20px;
	border: 1px solid #dae2e6;
	border-radius: 3px;
	justify-content: space-between;
	align-items: center;
}

.checkbox_wrap:last-child{
	margin-bottom: 0;
}

.checkbox_wrap .checkbox_right{
	position: relative;
	width: 102px;
	height: 38px;
}

.checkbox_wrap .checkbox{
	width: 100%;
	height: 100%;
	background: #c8cacc;
    appearance: none;
    position: relative;
    -webkit-appearance: none;
    outline: none;
    cursor: pointer;
    border-radius: 3px;
}

.checkbox_wrap .checkbox:before{
	content: "";
	position: absolute;
	top: 2px;
	left: 2px;
	width: 50px;
	height: 34px;
	background: #fff;
	border-radius: 3px;
	transition: left 0.2s ease;
	z-index: 2;
}

.checkbox_wrap .checkbox:checked:before{
	left: 50px;
}

.checkbox_wrap .checkbox:checked{
	background: #db7093;
}

.checkbox_wrap .checkbox_right .fas{
	position: absolute;
	top: 10px;
	font-size: 18px;
	z-index: 1;
	color: #fff;
	pointer-events: none;
}

.checkbox_wrap .checkbox_right .fa-check{
	left: 16px;
}

.checkbox_wrap .checkbox_right .fa-times{
	right: 18px;
}
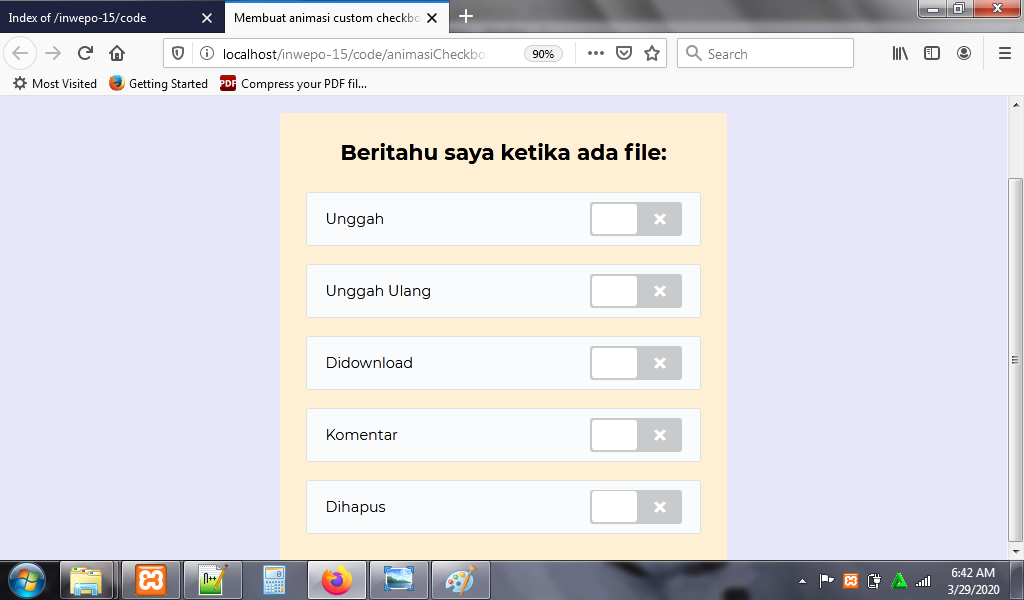
Simpan kode CSS di folder xampplite – htdocs – buat folder baru dengan nama CustomCheckbox – simpan code CSS dengan nama style.css.
5. Reload alamat url : http://localhost/CustomCheckbox. Tampilan dari custom checkbox.
Tampilan ketika custom checkbox di-aktifkan.
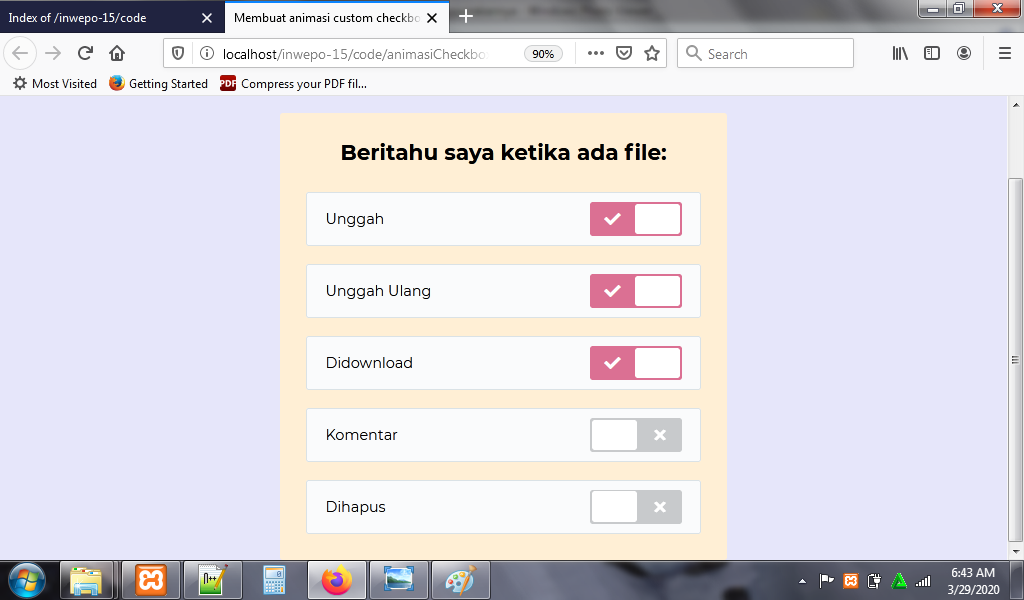
6. Selesai. Menarik sekali bukan?.
Demikian penjelasan dari tutorial ‘Cara Membuat Animasi Custom Checkbox dengan CSS’. Selamat mencoba.